Thursday, February 25, 2010

Glaze Results --Mayco Elements

As I search the internet looking for different glazes I've discovered that it's really hard to find pictures of different glaze color results.  I'm learning a lot of times they don't quite look exactly like the colors on the sample tiles.  My experience with lampworking has helped me, I'm sure. Certain colors of glasses need certain temperatures and conditions to achieve their best look.  Glaze is basically crushed glass in a paint type medium.  It's hard to find reference colors online (I know, I've looked).  So I'm writing this in hopes I can help someone else when they are trying to decide what colors they want to buy.

Today I am writing about Mayco Elements . I've only gotten four shades of this line, but I am planning to buy more.  One thing that is really nice about them is that they are non-toxic.  Another nice thing is that they have an incredible depth to them that creates a look beyond the Jr. High School Art Class look.

My first example is Blue Grotto .  If you followed that link you saw sort of a darkish blue.  Now look at this:
 
and this:


Both are Blue Grotto on Indian Red Clay.  The second piece was actually glaze fired 3 times.  The stilts were chipping some of the glaze off the bottom and I didn't like it.  Notice how it developed into more of a green shade.  Also, notice how the glaze likes to settle into recesses. 

The next color is Stormy Blue .  Basically on the tile it looks kind of like a steel blue, sort of chalky. 

In my case the piece became a gorgeous caramel shade.  The stormy blue shade actually worked into the recesses on the birds.  The base was the Indian Red Clay again.


On this piece there is a bit more of the blue showing through. This bird was created in white versa clay. 
Here is a color called Iron Moss .  In the online tile pictures it looks very metallic but from my experience it's much more mossy than irony.  


Notice how nicely it sinks into the design and highlights.  This is also on a base of red clay.


Iron Moss on white clay.  This is a bit thinner of an application.  Three coats seems to yield best results (as stated on the bottle as well). 
Last of all Patina . Now this one seems to be right on, easy to duplicate the results. 


This is on a brown stoneware clay.  


On white clay....


Annnnnd...raku fired.  I plan to work much more with this as a raku glaze. 
I hope this helps others out. Please feel free to ask if you have any questions.

Wednesday, February 24, 2010

Nesting

Well it looks like Hera is starting to sit on the nest.  The nest is mostly constructed of strips of 3 X 5 index cards, a few pine needles. I love how Zeus added his bit of flair with some fancy yarn draped over the side. I wasn't sure if they would go for it, but they seemed to like it.  As far as I can tell there is one egg.  I don't want to disturb her so I guess if she laid a second one, I'll get a surprise.  I'd like for it to hatch but the finches I used to have never managed to hatch a single egg.  So I'm not going to get my hopes up too high.
  
I've been working on trying to take better pictures for Etsy.  The light in my room seems to be about the best in the house.  I really like photos that are like a still life and use natural light.  From what I have seen you can have the best stuff, but if the photos look blah, no one even notices it. 
These are my latest little birds "Sweet Tweets" .  They were absolutely amazing to sculpt.  The birds honestly feel really good in my hands when I'm making them.  I used my red clay, which when wet looks almost like soft milk chocolate.  I love the color when it is wet. After firing it is decidedly orange.  I've found it works beautifully with the Mayco Elements  line of glazes. This is surprisingly the stormy blue shade.  The glazes sort of break up and the actual color goes into the crevices. I was hoping it would do something like this, so I'm pretty pleased.  I left the beaks of the birds the natural terracotta color, but I gave them a coat of clear glaze for a bit of shine. I've got one more in the kiln cooling that I used the blue grotto on.  Blue Grotto is a gorgeous shade :
 
It also settles in the recessed areas.  I love this line of glazes, they are super easy to work with.  The colors seem a bit weird in the jars but as long as you remember what you are doing it's not a problem. 

Monday, February 22, 2010

My Own Private Garden

Every time I see a thick green piece of moss, the first idea that pops into my head is TERRARIUM.   I once saw a show when I was a kid, I don't remember what it was called...Hodge Podge or something of that sort.  I remember they used to do all sorts of outdoorsy crafts....it was my kind of show.  They made this beautiful terrarium with a moss that I just looked up, British Soldier Lichen .   So I hauled out my huge jar, but apparently the lid did not survive our move.  I've found that Target has the most wonderful jars for terrariums, like this one here.  I like to start my terrariums with a layer of sand and gravel.  Aquarium gravel works great or landscaping gravel works too.  Then I put a level of activated carbon which you can find in the aquarium section of the pet store. Next I put a layer several coffee filters, but sphagnum moss is even nicer. I didn't have the moss but did have the coffee filters so that's what I did.  Then you put a nice layer of potting soil, I'd put at least 2-3 inches.  After that you are ready to add plants.  I like to start with a layer of various mosses. You can find them in shady, slightly damp areas.  Try not to totally clear an area but take small patches from several areas.  Ideally what you want is low growing, moisture loving plants (at least for this type of terrarium). I found some plants growing near the moss...they had these little darling four petaled flowers so I've added them, although I've had yet to figure out what they are.  Also I found sticks with lichen growing on them and one with a shelf mushroom.  I also added some seeds to this terrarium, I've chosen Royal Carpet Alyssum .  We will see how well it does! I'm also making little terracotta creatures for them.  I've taken one and coated it with a mixture of honey and vinegar. Then I rubbed it with a dry piece of moss. I'm hoping I can get it to grow on the hedgehog's back.

Saturday, February 20, 2010

Finished Jewelry, Dove update

I finally got some of my jewelry projects finished, photographed, and listed on Etsy.  I've been working on this since about 8 am, but I'm finally done.  My favorite new pieces are :
 

I'm excited about the raven because it's all free hand.  I just used a bamboo skewer to press the image into the soft clay.  It's a technique that I'm going to work on some more.  If anyone remembers, ravens and crows were some of my favorite subjects with lampworking.  I absolutely love them.  
The dove didn't exactly go as planned, but I still love him. I sculpted him using my male dove, Zeus as a model.  I wanted to raku fire him, so all bets were off when it came to color. The only disappointment with the color was the coral rings around his eyes became a silver too...and I really like the color contrast on the real doves.
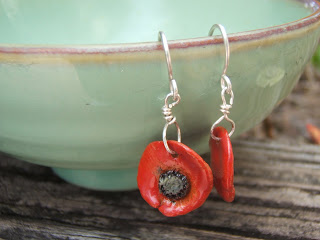
The poppy earrings have been laying around for awhile, waiting for me to put them together. I must say what I like best about this listing is the picture I took.  I love the colors in the picture.  It's given me further inspiration for some more beads to make using my aqua raku glaze and my red.  

So far I don't think Zeus and Hera have laid any eggs but I'm keeping their cage in a more secluded part of the house.  They have been working diligently on their nest..it seems their favorite material is strips of index cards. 

Friday, February 19, 2010

Pleased to be Picked

I was just thrilled to find out I was included in this Etsy Treasury today My Big Fat Etsy Nest .  The funny thing is my husband got me two doves for Valentines day, and they have been nesting too.  So nests are definitely on my brain.  I'm supposed to be working on some jewelry . I've even got the beads grouped into sets, but instead I've been messing around with a bracelet I'm making myself for my B-day.  It's got a very Celtic look and I got the directions from this book.  I've had the materials for about a month.  I got impatient and started my weave without a good clamp. It's come out ok but I'm sure the weave would have been nicer if I had used a stronger clamp.  Of course I had to go right into making it with sterling instead of going with the smart option--making it in cheap wire first. I love making beads, but I do think that when I branch out it's going to be with wire wrapping.  I thought about silversmithing, but some of the tools and supplies are so pricey.  If I took a class I might feel better about it.  Well, I guess I'll be trying to get this bracelet finished and then maybe start working on the jewelry I'm supposed to be making...lol.

Wednesday, February 17, 2010

New Glazes!

I just got my package of new glazes, I love Clay King they always ship so quickly. I got smokey blue, clear, and white raku glazes...and a small bottle of ivory.  The white and the clear are supposed to be more of a crackle effect I think.  I'm looking forward to playing with them.  I've been working on some lentil shapes that I've made into thistles and then some I've added a decorative edge to.   I think the latter will be crackled white with the area near the bead holes left unglazed so it turns a matte black.  It's a bit of a challenge doing the raku firing because I have to wait until my husband gets home, it's pretty much a two person job, but he seems to like doing it.  I've had to make my own little racks for raku, but it's tricky getting the beads ready because the wire slumps a bit and the beads end up touching stuff. This new style might help prevent that. 

Monday, February 15, 2010

First YouTube Tutorial

I know it's not the best, but it's not the worst either...lol. At least no one has to listen to me talking.

My Zinnia Tutorial

  I made some of these zinnias and was getting ready to list them, then I saw someone on Etsy's front page who had made something similar and I felt weird adding mine right after-- especially since hers were not only stunning but beautifully photographed.  I try not to look at stuff that is very much like mine when I'm on Etsy.  For one thing, even if it didn't influence me whatsoever, I feel concerned someone will think it did.  Also, if I have an idea I love, I'll feel disheartened if I find someone doing something similar.  Ignorance is bliss..lol...so I try not to look too much.  In my personal way of thinking, even if someone set out to do something EXACTLY like something of mine, it would always look a bit different because of the individual artistry of the other person. YET, here I am sweating it...lol.  Once I made a glass bead depicting a father penguin and a baby, yes I was inspired by some pictures of penguins, but not by someone's artwork...and this person actually made a big ole thing about it on a message board.  It was actually enough to sort of kill my creative spirit for a time.  I know it is part of what took my heart out of lampworking.  So this time around, I don't know if I will go much to ceramic message boards, I'd like to meet other artists, but at the same time there is always going to be someone pointing fingers and accusing people they don't even know. 

Anyway, I don't put out tutorials for my own gratification, I put it on to help other people starting out.  So if you use the tutorial to make something and then turn around and sell it, I'm honored.

New Raku Discoveries

I've discovered that Coyote Clay and  Color's  Gunmetal Green has some promising results with raku firing. It's a cone 6 glaze but seems to work decently at around cone 05 .  It reduces nicely and reminds me of Moretti copper green glass.  Now one thing I've noticed that even the blandest glaze ( i.e. black, clear, etc) can take on some iridescence when fired with quite a few items heavy glazed with "raku" glazes.  I'm sure this is similar to the idea of fuming glass beads with silver.  The  saturated iron glaze worked out pretty well too...at least it did what I wanted it to do, gives a nice rusty look.  I discovered this is not the case with the Really Red, obviously it needs a lot more heat.  I like the effect I got with  shino light  blue, gives sort of a rough silvery effect with pale blue.

So far I've tried Amaco raku glazes in Copper Patina, Matte Copper, Bluebell,  and Tarnished Silver.  I think my favorites have been the Copper Patina and the Bluebell.  Bluebell makes me think of verdigris and with some of the coppery reduction turns a bit pinkish.
<----copper patina

I approach raku with hopes of certain things, but very open minded to what comes out.   I had one batch where I think I should have let the temp get a bit higher but still I liked the effects of the beads. I like variation between shiny and matte.  I always gravitated to organic looks with my glass beads, I probably etched 80% of those I made.  

Wednesday, February 10, 2010

Useful Things to Know When Working with Clay -- Part 1

I've been thinking a lot lately about the merit of a bamboo skewer.  You can get a big package of them for about $1 and they are about the best tool you will find for working with clay.  I've used them to carve details, create molds, poke holes, hold beads for drying, wrap wire for loops and I'm sure I've used them for other things.

Another thing I love is polymer clay.  I use it to make molds quite a bit. You can press buttons into it, as I've mentioned, but try rolling out a sheet and them poking it with the blunt end of the bamboo skewer, or try using a straw.  You quickly create a texture similar to that of a sea urchin test or a tribal design of dots. You can coil metal wire and press it into a sheet of polymer clay and you can create another pattern.  I do this with earthenware clay too, but polymer has the advantage of being able to be baked right away, and test the design.  I've recently been working on molds using polymer clay and bamboo skewers to make floral molds for pendants.

I've learned that stoneware clay makes beautiful raku pieces and that lower temp clay doesn't work as well because it becomes too close to vitrification and won't pull in the smoke as well.  This was a HUGE tip to find because it has a made a tremendous difference.
 
  
As you can see these are a big improvement over my first birds.  They hold up to the thermal shock wonderfully as well.

Monday, February 8, 2010

Raku Success!

The stoneware clay worked wonderfully.  I'm quite pleased with the results but I do think I'll try a run with only 2 coats of glaze. Some of the colors were supposed to be matte but came off with very glossy surface, still very pretty.  Going to try to fire more birds tonight and hope they will survive. This hedgehog has been glazed with Mayco  matte copper. I glazed the face with a clear so you can see the pretty stoneware clay beneath. I also went with newspaper and was happier with the results because there is less matter burned onto the surface of the beads.
I'm still working things out but I'm much closer to where I'd like to be!

Friday, February 5, 2010

The Good, The Bad, and the Ugly

THE GOOD -So I've been experimenting in the wild world of firing and glazing ceramics.  I've mostly had experience in the sculpting phase so this is uncharted territory.  I've had a few pieces so far that I'm quite pleased with, and I've come up with some techniques that I like.  Most of the pieces in the above pic are pretty much exactly what I was going for...color wise and also the finish is pretty. 

THE BAD-This is what happened when I tried my hand at raku firing.  I'm still in the trouble shooting phase obviously.  I was kind of heartbroken over this because a few of them looked very nice....until their heads cracked off.  I'm beginning to wish I had bought the raku clay after all but at the time I wasn't planning larger sculptures.  I was reading on a raku site where it recommended underfired stoneware clay...which I have about 80 lbs of..so I might see how it holds up to the thermal shock.  I also learned that mostly I'm not painting on my glaze nearly thick enough.  The thicker ones came out better.  Also so far spanish moss produces a nicer effect than pine hamster bedding.  I think I'll try newspaper next time though. 

THE UGLY--Structurally they are sound, yet the colors are pretty ghastly.  Some are from my first raku firing attempt  where I did not use a thick enough application of glaze.  I don't like the color of green on this bird and the other bird is not THAT bad, just rather dark so it's hard to see the detail.  These are the "what not to do beads". 

I've actually managed to have some jewelry quality beads though so that's not bad for just starting out.  My first lampworked beads were very grim so I need to remember that when I'm feeling disheartened.

Wednesday, February 3, 2010

The Kiln Has Landed

....on my front porch! Finally it has arrived and I've fired my first run of greenware with no casualties.  Today I've been working on glazing. Deciding what to fire normally and what to fire with the raku technique.  I think I also might see what happens when I use some of the regular glazes with raku.  I always enjoy this experimentation part of creating.  I'm figuring even if it comes out mud brown instead of blue, there still can be a purpose for the piece.

Tuesday, February 2, 2010

Silky Birds

Yesterday I made some super cute bird sculptures, they are so silky soft with plump bodies like little wrens or sparrows.  I think I'm beginning to realize why I am enjoying clay so much.  Don't get me wrong, I love the glow and sparkle of glass, but the frustration of being constantly interrupted at home and fact that my hands would go numb at the most inopportune times, it was too stressful to get very much enjoyment out of it.  The kneading of the clay feels so nice on my hands.  When I'm sculpting, it's almost like I'm caressing the clay into being.  The design I like best is so simple yet I think it is elegant.  I've made some more ornate birds but the silky smooth ones will be the kind that people just want to hold.  I wanted a very simple design because I think it will show off the raku glaze to the best advantage.  Now if only my kiln would arrive so I can fire this enormous pile of greenware that is amassing in my garage.